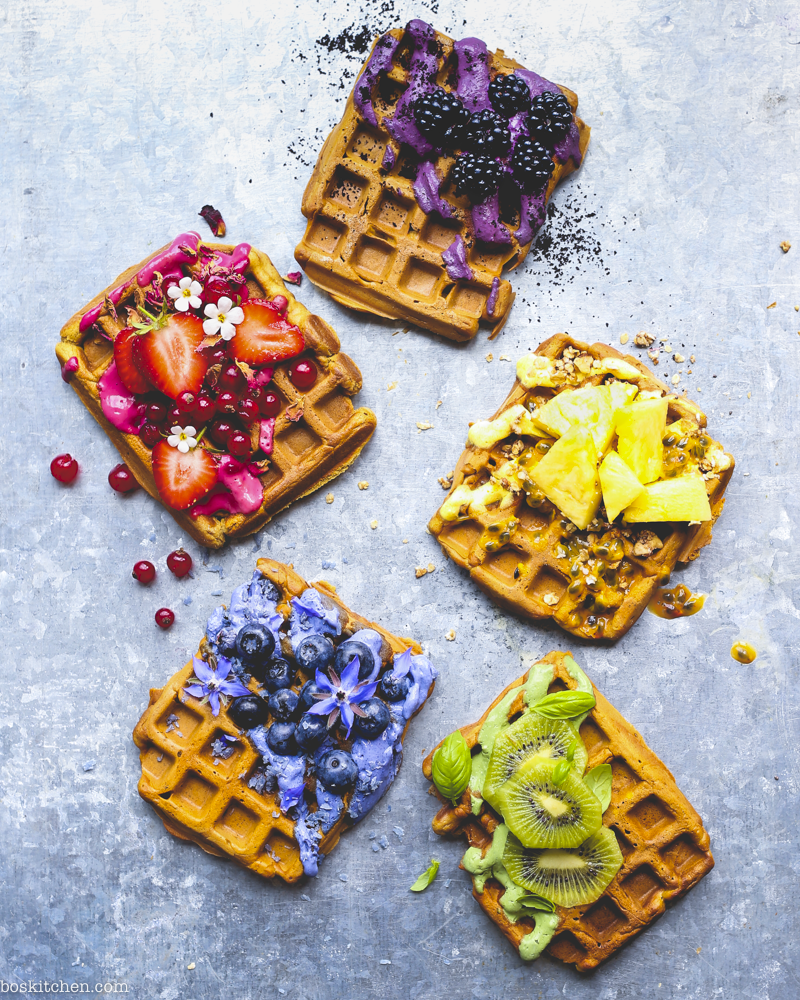
It’s been a hot minute since I updated the blog and I figured my go to aquafaba waffle recipe was definitely worthy of posting! I use this recipe pretty much every weekend and it’s really very flexible, so don’t worry if you don’t have all the ingredients. Apart from the aquafaba of course, that is essential! …
Marbled banana bread
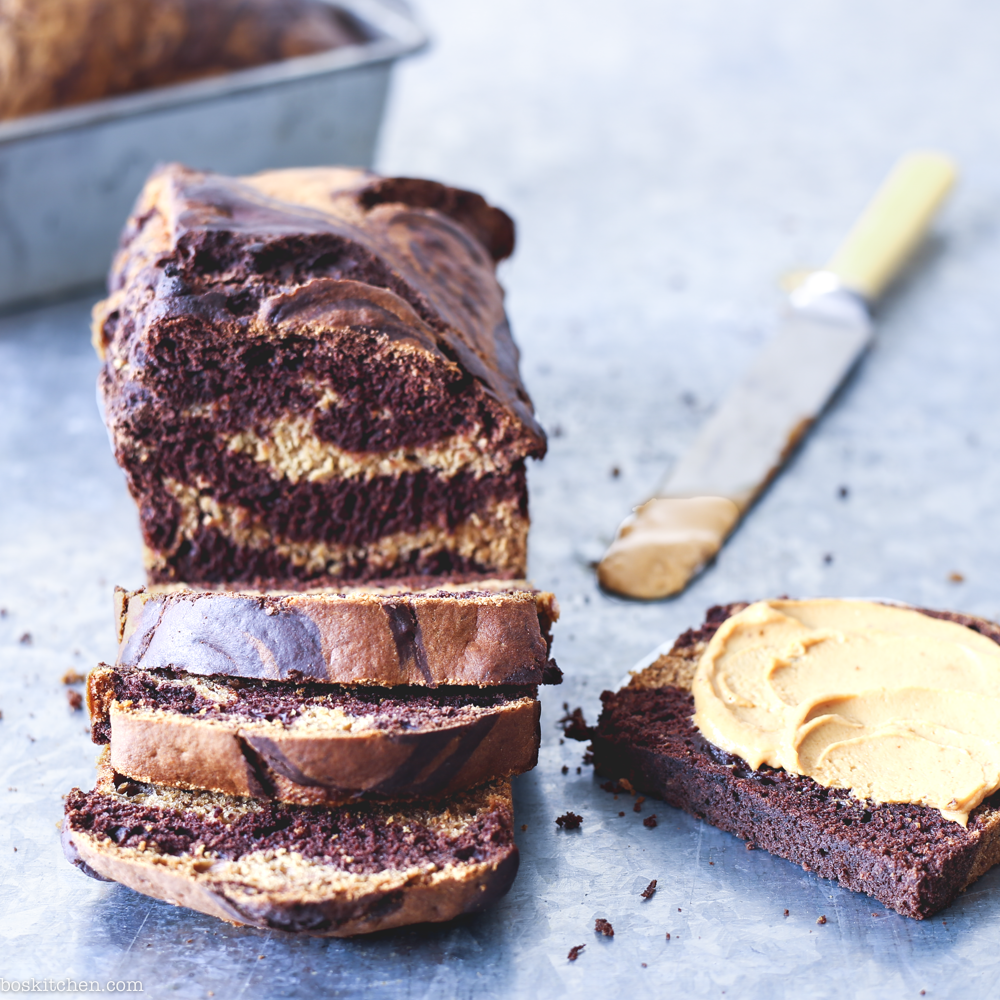
Friends, I got a special recipe to share with you this week – marbled chocolate banana bread. This one is from my battered old cookbook and has been a staple recipe for over ten years now. It’s a keeper. You’re only an hour away from this delicious bread. …
Cherry cheesecake ice cream
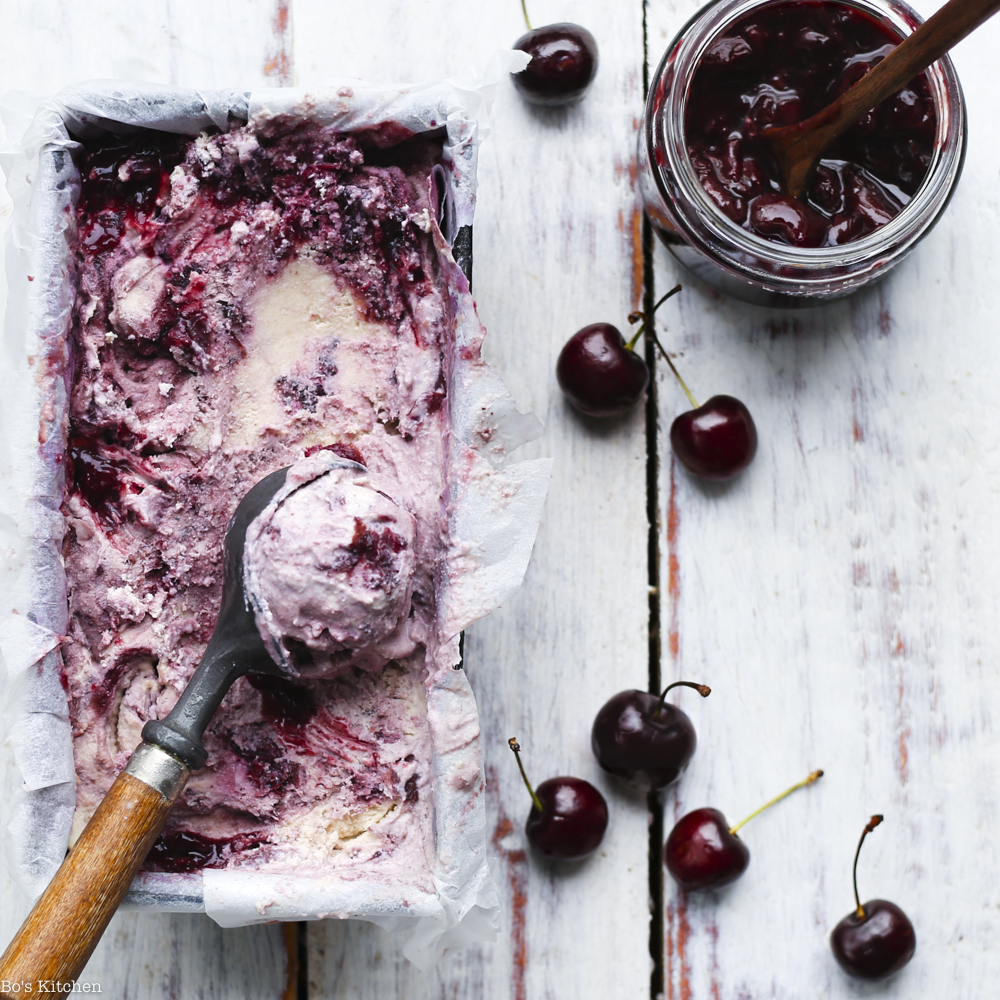
The cherry obsession continues. This time in the form of a creamy cherry cheesecake ice cream. This has to be one of my favourites yet, rich and sweet with a beautiful cherry compote ripple. …
No bake nut brownie

I promised to publish this recipe a couple of weeks ago and it’s finally here! Rich, indulgent, no bake brownie that’s refined sugar free, gluten free and vegan of course.
If you’ve never tried raw brownies before, bookmark this recipe now! I promise you’ll love them – any dessert that’s loaded with chocolate and doesn’t require baking is always a winner for me.
I’m a huge brownie lover but I’m always on the hunt for a healthy version. This one is made with cacao rather than cocao, which is unrefined and therefore more nutritionally dense. I’ve also added chia seeds and maca powder to the brownie base, for an extra helping of protein, b vitamins and omegas. The base is fudgey but with enough bite to hold together and the chocolate ganache is smooth, creamy and sweet, so rich and delicious that just a little slice will suffice.
Feel free to play around with the recipe, you could try different nuts or seeds, personally I love using hazelnuts because they taste so magical with chocolate. I’ve made the base with almonds and walnuts and both came out delicious. I’ve had fun testing out these brownies, they never seem to last very long which is a good sign!
Many thanks to two of my faves, Minimalist Baker and The Bojon Gourmet who have both inspired me with their incredible raw brownie recipes to try out whilst creating these! This recipe is heavily adapted from their recipes so I must say thank you!
I’m thrilled to be featured in the first edition of In The Moment magazine, out in the UK this month! Lots of my recipes are in there, along with an in depth interview with me about how I got into veganism, blogging and cooking. For more information check out their website here (these brownies are featured there too).
If you do try these out, please let me know – I’d love to hear what you think of them! You can also subscribe to my mailing list (just look on the right of this page) and you’ll get my recipes emailed directly to you before anybody else.
Sending you copious amounts of chocolate ganache,
Bo
xoxoxo
No bake nut brownie

Prep time
Cook time
Total time
Author: Bo's Kitchen
Recipe type: Dessert
Serves: 10 servings
Ingredients
- 1.25 cup hazelnuts
- ¼ cup almonds or walnuts
- ½ cup raw cacao powder
- pinch of salt
- 2 tbsp chia seeds
- 1 tbsp maca powder
- 1 cup pitted dates
- 1 tsp vanilla extract
- ¼ cup coconut oil
- ¼ cup maple syrup
- ¼ cup cacao powder
- 2 tbsp coconut milk
Instructions
- Start by making the brownie base. Preheat the oven to 180•c . Add the hazelnuts to a baking tray and cook for about 10 minutes, until golden. Allow to cool then rub off as much of the skin as you can with a clean tea towel. Set about 2 tbsp aside for the ganache. Place remaining hazelnuts in a food processor and process until they are a fine, sandy texture. Now add in almonds, cacao powder, chia seeds, maca powder and salt and pulse until the mixture comes together. Set aside in a bowl.
- Add pitted dates and vanilla to the blender and pulse until it forms a paste. Add back in the brownie mix and pulse again until a rough dough is formed - it should stick together when you press it together, if not, add a tbsp of water at a time.
- Put mixture into a lined loaf pan, pressing down firmly to flatten out and pop in the fridge to set.
- Make the ganache topping by melting coconut oil gently over a small pan of water. Take off the heat and add in coconut milk, maple syrup and cacao powder. Whisk until totally smooth and leave to cool for at least 15 minutes. Pour over the brownie base and sprinkle with hazelnuts, cacao nibs and sea salt. Chill until firm, cut into slices and enjoy! Keep well in the fridge for up to 5 days.
Ultimate pizza dough

I love pizza. Who doesn’t though? It’s one of life’s great pleasures. I really enjoy making my own pizza dough, there’s something incredibly therapeutic about the process. I’m fairly fussy about the recipe though. Fluffy, puffy dough is where it’s at, just like you get at a proper pizza place. Don’t get me wrong, the gluten free, cauliflower crusted ones are yum too, but more often than not I’m drawn to the real thing.
I recently invested in a pizza stone so needed to find a worthy recipe for it. This one doesn’t disappoint, it really is the ULTIMATE pizza dough. It’s a wonderful texture, full of flavour and gives a satisfying amount of puff when cooked on a stone. You can make several small medium to thin crust pizzas, or a few large, thick based pizzas, I’ve included instructions for both. If you haven’t tried making your own yeasted dough, give this recipe a whirl and I promise you’ll want to make it again and again.
The reason this recipe works so well is due to the very small amount of yeast used, the high water content and the long proving time. Although the first batch will take you the best part of a day to make, I tend to whip up a big batch and freeze several dough balls so I won’t have to make it again for a few weeks. Using less yeast is easier on your digestion too, so there are some benefits to taking your time with this one!
If you’re into bread making, you’ve probably already got a dough scraper, but if you haven’t I can’t recommend one enough. My Mum surprised me with one in the post a few years ago now and told me it ‘only costs 20p’ but will ‘probably be the most useful thing you’ll ever receive’. I had no idea what it would be of course, but I soon realised how invaluable this little bit of plastic was. You can use it to knead very wet dough, saving you time washing off sticky dough from your fingers. It also removes any excess dough from your kitchen counter tops in a jiffy (if you’ve ever tried to scrub off dried dough from the counter you’ll know how time consuming this can be). If you want one, this is the exact one I use. The pizza stone I use is here, it even comes with a peel – essential for quickly transferring your pizza to the oven.
I topped this pizza with a basic marinara sauce, sweet bite peppers, red onions, courgette ribbons and fresh thyme and basil. I really don’t miss the cheese at all, but if you’re looking for a great plant based cheese you can make at home, check out my friend Nathalie’s fabulous chèvre cheese recipe here.

If you try this recipe, I’d love to hear what you think! Please do leave me a comment below, or take a snap and tag me on Instagram (@bos.kitchen).
Happy pizza making,
Bo
xoxoxo
Ultimate pizza dough

Prep time
Cook time
Total time
Author: Bo's Kitchen
Serves: 6 small pizzas, 4 large ones
Ingredients
- 1kg strong white bread flour
- 700g water
- 15g salt
- 2g yeast
Instructions
- Throw all ingredients into a bowl and knead well for around 10 minutes. Use a dough scraper to knead it if you have one. Turn and knead briefly for a couple of minutes every 10 minutes for an hour.
- After an hour, stretch dough out with your hands and return back to the bowl. Leave to rise for at least 4-6 hours.
- Divide dough into 6 balls to make individual medium base pizzas, or 4 balls to make larger pizzas. Leave shaped balls for another hour to rise.
- Wrap any dough balls you aren't using up in oiled clingfilm and freeze. Heat up pizza stone or baking tray for at least 15 minutes in your oven, at the hottest temperature (mine will go to about 220•c).
- If you have a pizza peel, dust well with flour and stretch the dough out with your hands to form a rough base. Try to get the dough under 1.5cm thick for a medium base pizza. Top pizza and use peel to slide onto preheated pizza stone. Cook until golden and puffed up, usually about 8 minutes.
Berry galettes
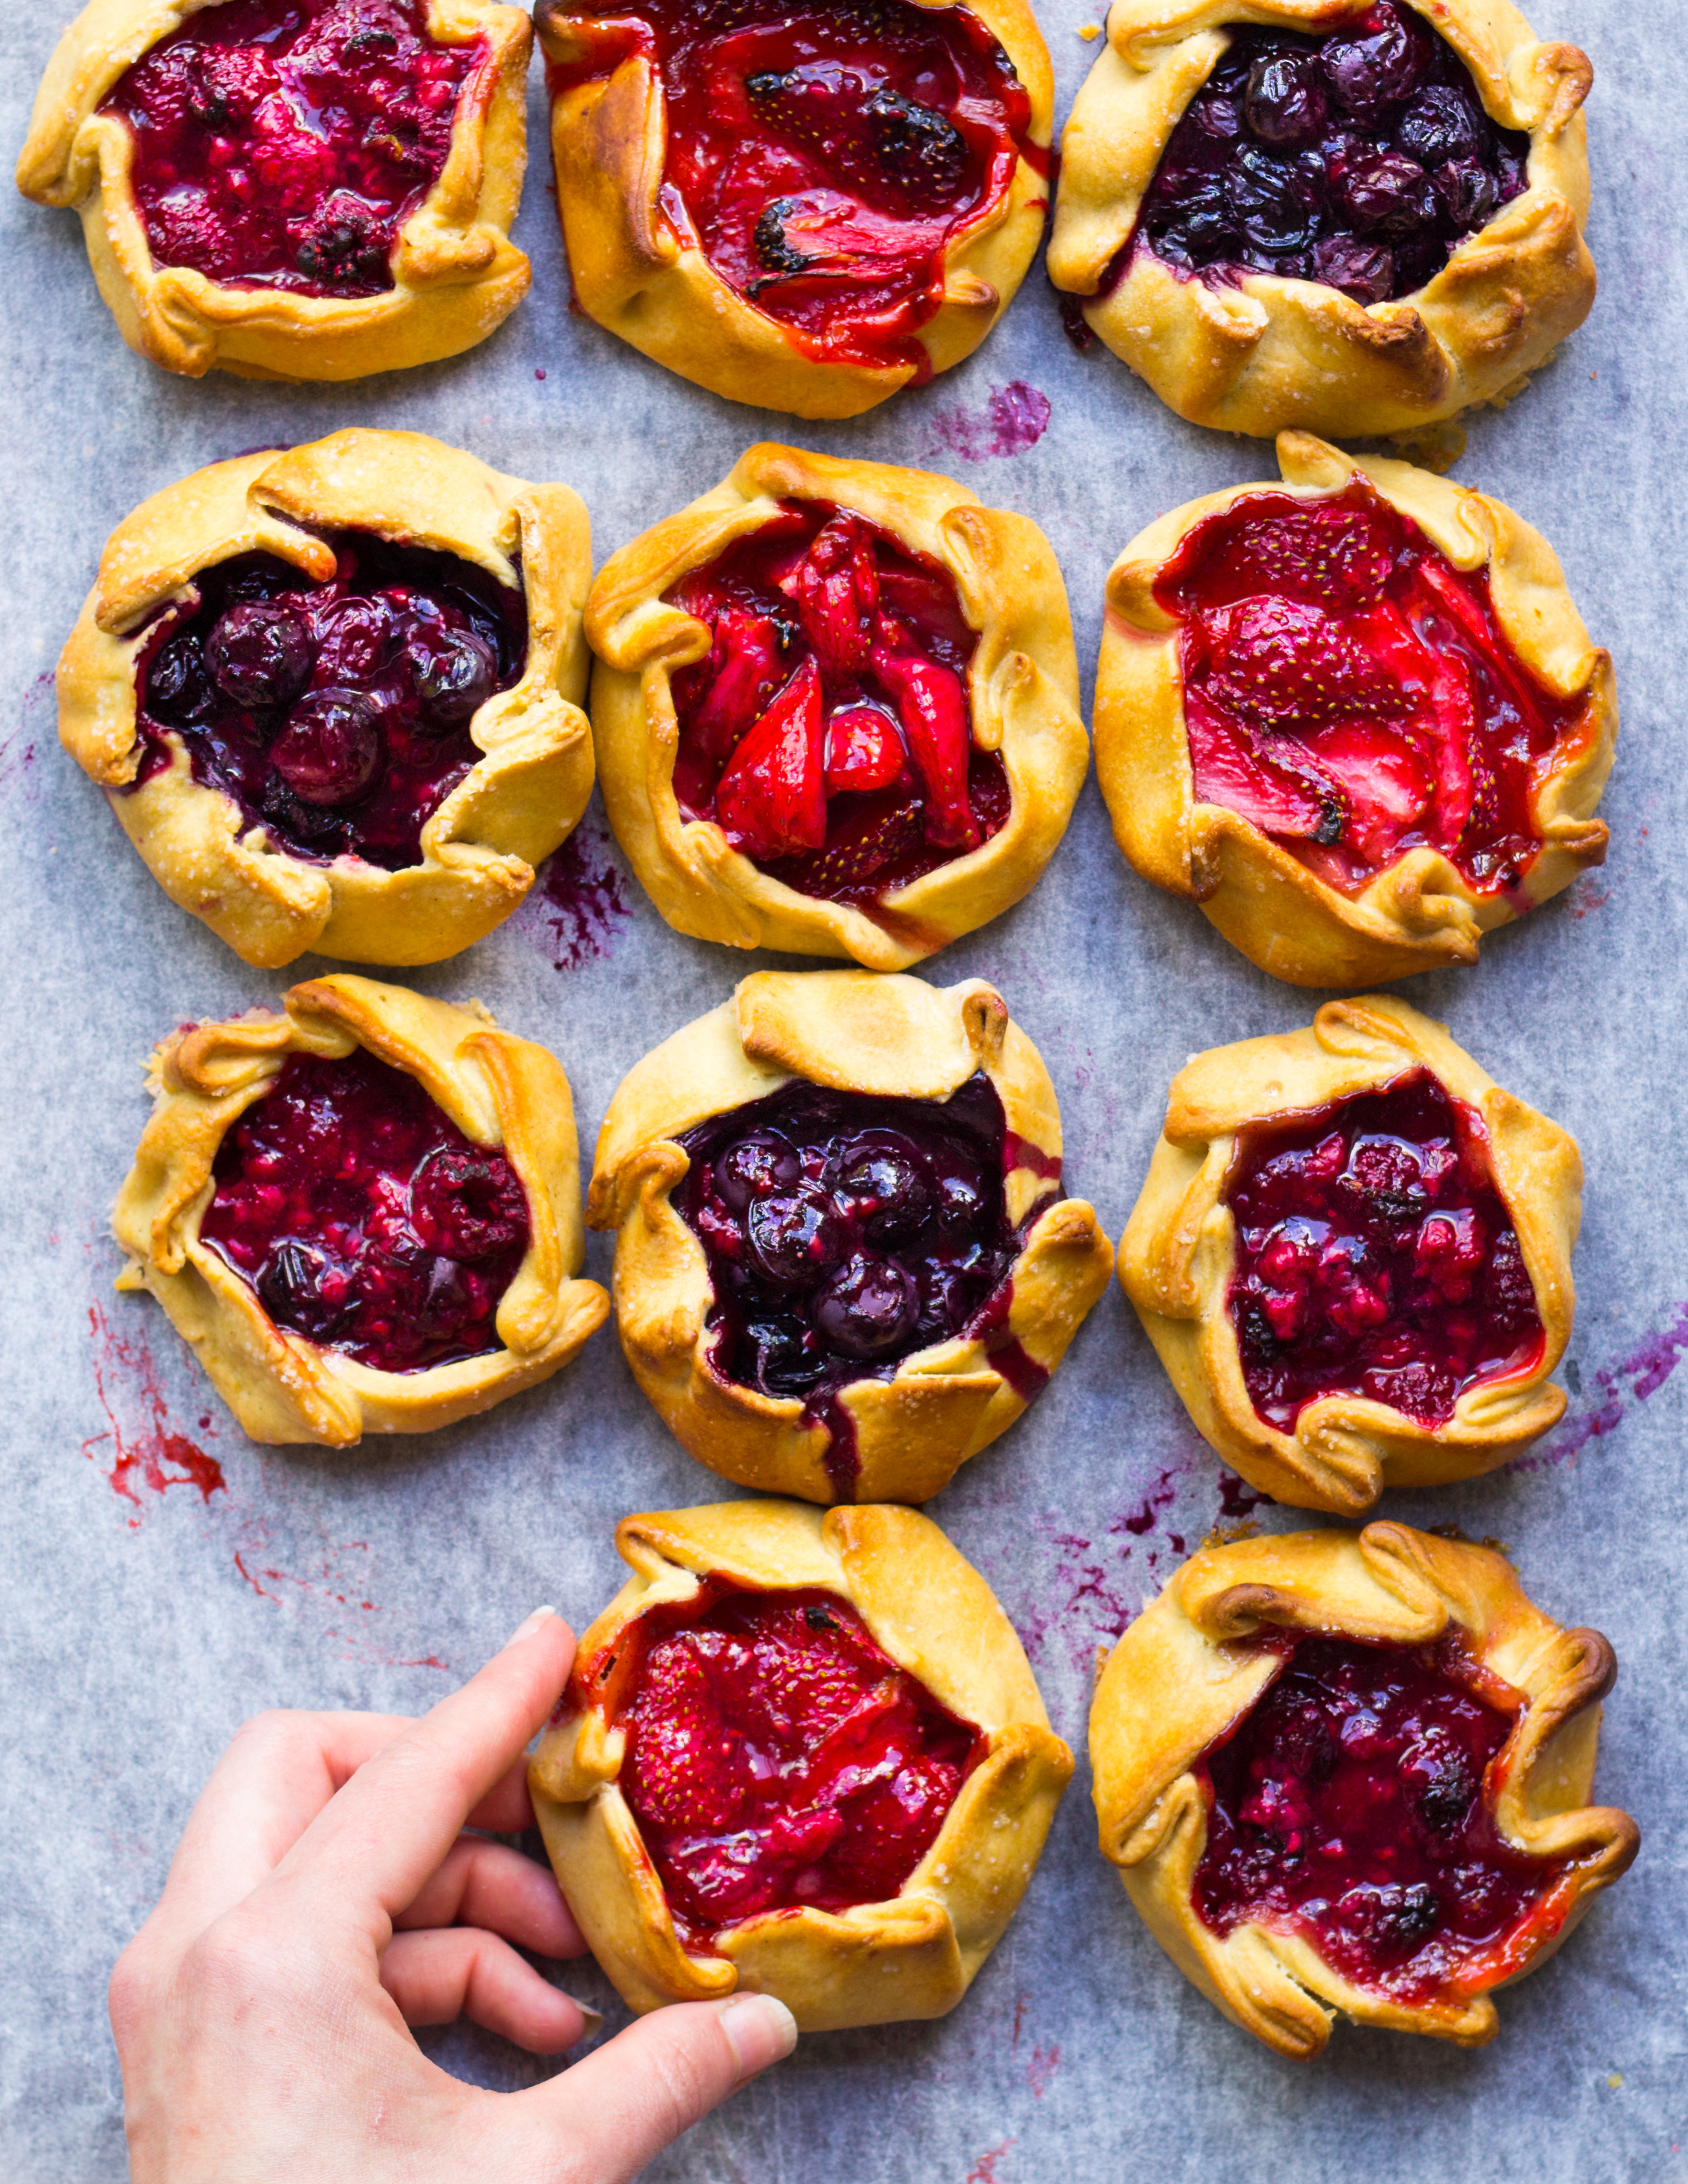
Summer is almost here and what better way to celebrate than with these little summer berry galettes? Luscious, jammy berries encased in a vegan flaky pastry. Perfect with a dollop of vanilla coconut cream or a big scoop of ice cream. I’ve wanted to make galettes for so long and I’ve already made three batches in one week. Making up for lost time, eh?
These are actually really simple to prepare and you’ve most likely got the ingredients in your cupboard already. Galettes beat tarts any day for me, because your get more crust to fruit per mouthful and who doesn’t love pastry?

I tried making these with a mix of gluten free flours but I just wasn’t happy with the way they looked. They still tasted nice though, so feel free to sub for an all purpose gluten free flour if you wish. I’ve also put an option to use coconut oil for the pastry rather than vegan margarine, but they won’t be as flaky and golden. Coconut sugar can be used for the fruit if you’d like to make these refined sugar free. The good thing is they’ll work whichever ingredients you decide to use, it’s a pretty flexible recipe.
They’re delicious served fresh from the oven, or stored in the fridge and heated up just before serving. The perfect summer berry celebration pud.
I’ve had fun eating my way through hundreds of galettes this week to perfect this recipe, so please do let me know what you think in the comments below, or tag me on Instagram @bos.kitchen.
xoxo

Berry galettes

Prep time
Cook time
Total time
Author: Bo's Kitchen
Recipe type: Dessert
Serves: 12 small galettes
Ingredients
- 2¼ cup plain flour/gf plain flour
- ½ cup vegan margarine/coconut oil
- ¾ tsp salt
- 1 tbsp cornstarch
- ⅓-1/2 cup ice cold water
- 1 tsp apple cider vinegar
- 1 tsp almond extract
- ½ cup raw cane/coconut sugar
- 1 tsp vanilla bean paste
- 1 lemon, juice and zest
- 1.5 tbsp cornstarch
- pinch of salt
- 1.5 cups each of blueberries, strawberries and raspberries
- ¼ cup nut milk
- coconut sugar for sprinkling
Instructions
- Make the pastry. Chop up coconut oil or margarine into rough pieces. Add to food processor with flour, salt, cornstarch, ACV and almond extract and pulse until crumbly. Slowly add the water until a dough is formed. Take out and flatten into a disc on a floured surface. Wrap in clingfilm and chill in the fridge for 30 mins.
- Let the dough rest for a minute or two to come to room temperature. Roll the dough on a lightly floured surface into rounds, you can make bigger ones or 12 small ones, using a 5 inch bowl. Use a pizza cutter to trim any excess pastry. Stack the rounds on a plate, with greaseproof paper and chill while you make the filling.
- Pop a large lined baking tray in the oven to preheat at 220•c. Mix sugar, vanilla, lemon, salt and cornstarch in a medium sized bowl. Toss fruits in sugar mix until evenly coated. Divide the mix between pastry rounds, leaving an inch gap around the edge. Go round the dough in one direction, pinching and folding the pastry. Top with extra fruit if you need to. Pour over any juices from the sugar bowl. Brush pastry with nut milk and sprinkle with sugar.
- Bake for 30 mins, turning half way through until golden and the fruit is jammy. Remove immediately onto a cooling rack. Delicious on their own, or with coconut whipped cream.
Baked mini donuts

I’m kinda obsessed with small things. Especially when it comes to food. That’s why I simply couldn’t wait to put my new mini donut pan to work this week. I’ve ended up with a whole cake tin full of these little beauties and they are perfect for popping into your mouth with a coffee, or sneaking a little snack in whilst cooking dinner! Sometimes you only want a little bit of sweetness, and these babies are just the trick.
These would make a great gift for your friends or loved ones, I made about 24 baby donuts with this recipe, so there’s plenty to share. Of course if you don’t have a mini donut pan, feel free to use a regular size one, which should yield about 12.
These are baked, dairy free and the donut is refined sugar free. They’re flavoured with classic donut spices, nutmeg and cinnamon. I can’t resist proper icing sugar for the frosting, but feel free to sub with a sugar free icing if you wish (my friend Tiina @myberryforest, has a great sugar free icing recipe here). Although I usually avoid white sugar, I don’t mind it in small amounts every once in a while. Everything in moderation, right? Most coloured gels are vegan, but do check the ingredients to make sure.
I hope you enjoy this recipe as much as me, please take a snap if you make them and tag the picture @bos.kitchen on Instagram so I can see! I’m going to share every remake of my recipe on my Instastories, nothing makes me happier than seeing one of my recipes recreated!
If you’d like to know a bit more about me, where I’m from and how I got in veganism, hop on over to my friend Julie’s @rawfoodchefjulie‘s fabulous and informative blog at julieslifestyle.com.
Stay sweet,
Bo
xoxo
Baked mini donuts

Prep time
Cook time
Total time
Author: Bo's Kitchen
Recipe type: Dessert
Serves: 24 mini donuts or 12 regular size
Ingredients
- 1 cup plain flour (can sub plain gluten free)
- 2 tbsp oat flour (or more plain flour)
- ½ cup coconut sugar
- 1.5 tsp baking powder
- ¼ tsp pink salt
- ¼ tsp nutmeg
- ½ tsp cinnamon
- 1 cup cashew mylk (or other plant based mylk of choice)
- ½ tsp apple cider vinegar
- ½ tsp vanilla
- ⅛ cup aquafaba
- ¼ cup avocado/rapeseed oil
Instructions
- Preheat oven to 180•c and brush a mini donut pan with a little oil.
- Combine all dry ingredients with a whisk. Make a well in the middle.
- Pour all wet ingredients into the well and mix with a fork. Gradually mix in the dry ingredients until combined, to form a very thick batter.
- Pour a little batter into your donut pan, taking care not to fill right to the top, as they will rise whilst cooking. Smooth out with your fingers to ensure the batter is distributed evenly.
- Bake for 10-12 minutes, until a toothpick comes out clean.
- Allow to cool completely on a cooling rack before decorating.
- If making frosting, mix 1 cup icing sugar with 2-3 tbsp cashew mylk until thick and smooth. Add more mylk if you need to, a tbsp at a time. Now divide into three bowls and add a drop of vegan food colouring paste. Stir well and dunk each donut to coat.

Herby flatbreads with pink pickles

Happy May! It’s cold and cloudy here in the UK, but this isn’t stopping me from entering full on summer mode. A girl can pretend right? I’ve been working hard to develop some more savoury recipes for you guys, as I realise I have about a million sweet recipes and I do eat more than just parfaits and unicorn food. …
Chia and beet mousse parfaits
 Happy almost May! I can’t believe spring is almost on the way out now and I’m finally finding time to bring you a new recipe. I have to apologise for the lack of posts lately, this last month has flown by in the blink of an eye! I’m back with a super powered parfait recipe for you, a sweet, beety treat, the perfect breakfast for a spring morning.
I had the idea for this mousse after spotting a chocolate free avocado mousse on Instagram. I really wanted to give it a try as I love the texture of avocado mousse, but wanted something fruity. I think I overdid it the last time I made chocolate mousse.
Beetroot is one of my favourite veggies, not only does it help with blood pressure, it also helps with liver detoxification, digestive health and boosts the immune system. It’s packed with iron, which is super useful if you’re feeling a little run down or tired. If you don’t like beetroot, beetroot powder is the best way to get the benefits without the taste.
I’ve paired this mousse with chia pudding for the ultimate good for you breakfast. It’s a wonderful way to enjoy avocado for breakfast too! I’m not always a fan of straight up chia pudding, so I find it easy to enjoy with yoghurt, mousse and berries.
I’ve got some exciting news – I’m going to be in two magazines very soon! I can’t wait to share the details with you. If you’re reading this far, thank you for your support, I’m truly grateful for you following me on my journey.
Hope April has treated you well, babes!
xo
Chia and beet mousse parfaits

Prep time
Total time
Author: Bo's Kitchen
Recipe type: breakfast/dessert
Serves: 2 large portions
Ingredients
- ¼ cup chia seeds
- 1 cup nut mylk of choice
- 1 tsp vanilla extract or ½ tsp vanilla bean paste
- ½ cup plus 4 tbsp dairy free yoghurt (I used coconut yoghurt)
- 1-2 tbsp organic beetroot powder
- ½ lemon, juiced
- 1 mandarin, juiced
- 2 avocados
- 4 tbsp maple syrup
- Figs and fresh berries, for toppings (optional)
Instructions
- Make chia pudding at least 20 mins before you want to enjoy the parfait, or prep the night before and keep in the fridge. Mix chia seeds, nut mylk and vanilla extract in a jar and stir well. Set aside, stirring again after five minutes or so.
- Add avocado, beet powder, fruit juices, 4 tbsp dairy free yoghurt and maple syrup to a food processor and blend until smooth and creamy. Check the taste and add more sweetener or beet powder as required.
- To assemble - stick thin slices of figs on the inside of your glass. Gently spoon a dollop of beet mousse on the bottom of each jar, then the chia pudding. Now layer the mousse and yoghurt and top with fresh figs and berries. Any leftover mousse will keep for up to 2 days in the fridge (cover with a layer of clingfilm to keep smooth).

Double chocolate and raspberry brownies

Double chocolate and raspberry has to be a match made in heaven, right? I love brownies but raspberries take this bake to a whole new level. …